

Seed Viability Test: Float, Germination, and Visual Checks
Learn which visible clues reliably show seed viability and which do not, plus step-by-step checks you can do at home before relying on a single photo.
Quick answer for seed viability test
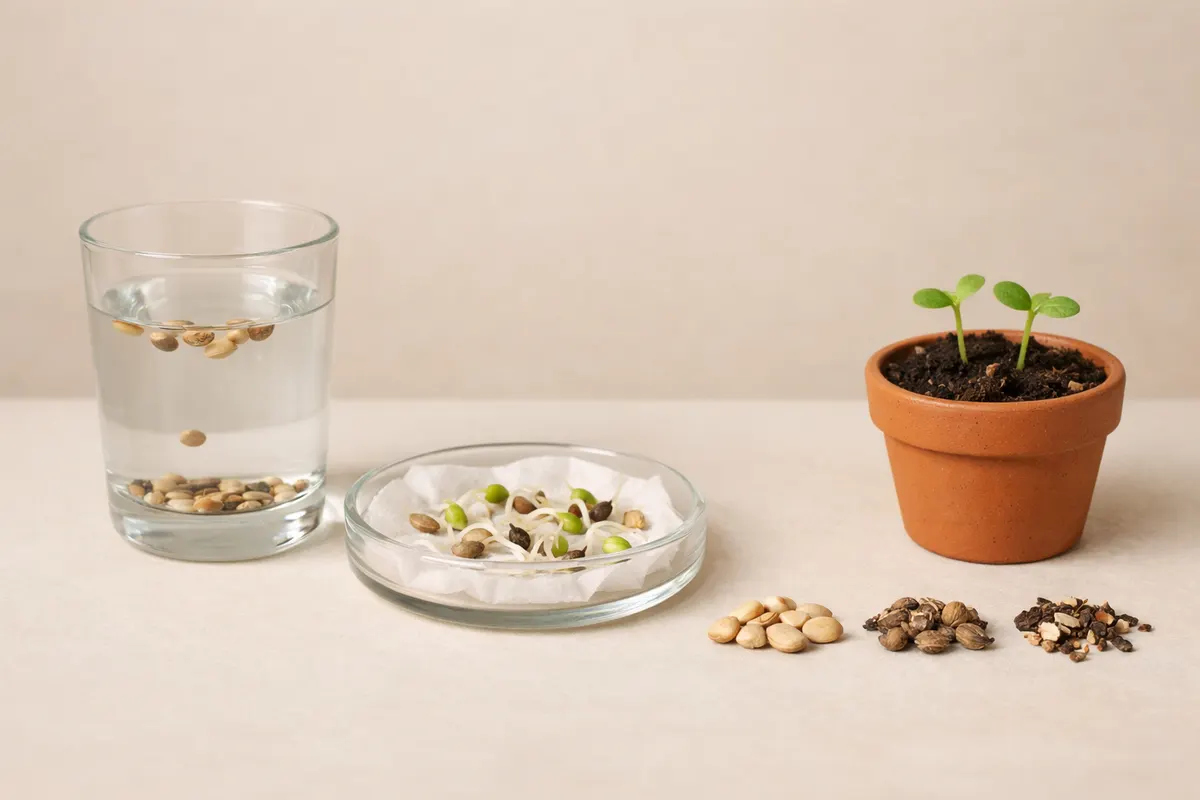
A seed viability test gives you a realistic idea of whether seeds in hand can germinate, but a single photo rarely proves viability on its own. For most hobby and small-scale uses, the strongest visual clues are intact seed coat, absence of obvious pest damage, and the seed’s plumpness relative to its typical shape. Simple in-home checks—float tests and small germination trials—turn those visual signals into stronger evidence.
Expect a float test and a short germination tray test to be the reliable next steps after inspecting a photo. A float test (briefly placing seeds in water) can separate obviously hollow or insect-damaged seeds from denser ones, while a germination test confirms live embryos over days. Neither method is perfect: flotation can give false negatives for very dry but viable seeds, and germination trials require a few days and consistent warmth and moisture.
Use visible clues as a triage: they help decide whether to run a germination test, discard obviously damaged material, or research species-specific dormancy quirks. Treat photos and single-clue checks as initial notes, not final proof—context like collection date, local season, and the parent plant type matters for interpreting any result.
- Strongest immediate clues: intact seed coat, plump shape, lack of holes or frass.
- Quick at-home follow-ups: short float check and a 10–25 seed germination trial.
- Context that matters: when seeds were collected, whether they were dried, and the species’ dormancy pattern.
- Avoid declaring viability from color or a single photo angle—use photos as a starting point.
Strong visual clues that suggest viability
When assessing a seed viability test from a photo or at the kitchen table, prioritize structural clues that survive lighting and angle changes. The seed coat’s integrity is the single most reliable photo clue: an unbroken, taut seed coat usually indicates the embryo hasn’t been exposed to air or eaten by pests. For many species, plumpness is a consistent sign; a shriveled or collapsed seed is more likely to be non-viable.
Texture details—fine ridges, seams where the two halves meet, or a glossy surface—are often species-specific but generally indicate the seed’s tissues are intact. Look for uniform surface patterning rather than patches of discoloration or soft-looking areas; those often point to mold or decay. In photos, use a macro or close-up shot that shows the seam and one full face of the seed so you can see whether the coat is whole.
Size relative to normal expectations helps when you know the species. For example, grass caryopses or milkweed achenes will have a predictable profile: a full seed will fill its pod cavity rather than look compressed. If you don’t know the species, collect multiple seeds for comparison—uniform plumpness across a sample is a stronger indicator than one plump and several shriveled items.
Evidence of recent chewing, entry holes, or frass (tiny sawdust-like debris) is a reliable negative clue and should move seeds directly to discard or to a more stringent germination test. Likewise, soft, discolored patches that appear matt or powdery are red flags for fungal damage and reduce the likelihood of successful germination.
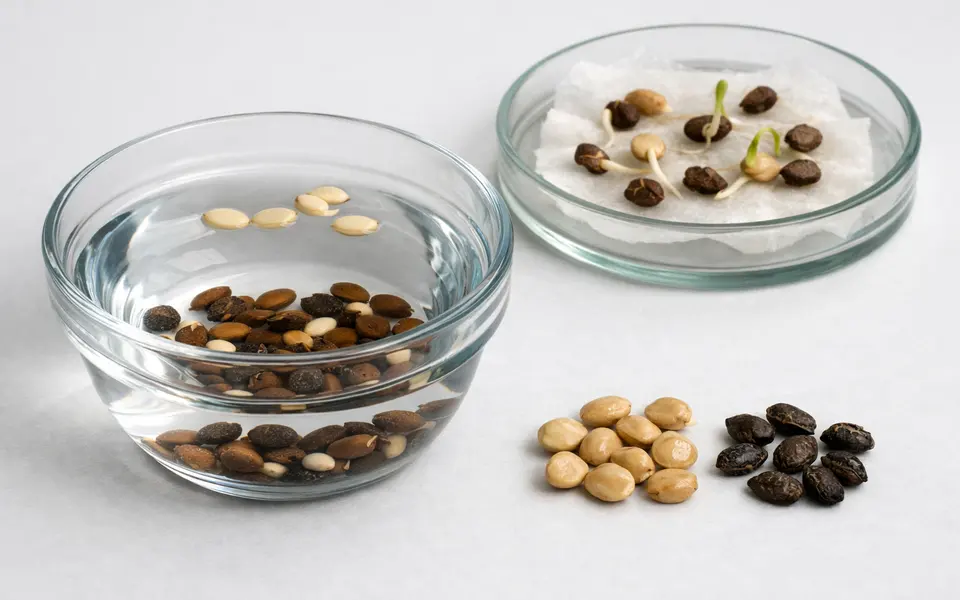
- Intact, taut seed coat — best single photo clue for an intact embryo.
- Plump profile and full shape — compare several seeds for consistency.
- No entrance holes, frass, or chewing marks — pests usually kill viability.
- Clear seam and surface patterning — shows tissues are structurally sound.
- Absence of soft, powdery, or fuzzy areas — reduces risk of mold-related failure.
Weak signals
Color alone is one of the weakest clues for a seed viability test. Many seeds darken as they dry or with age, and some species naturally vary in color. A lighter or darker seed in a photo may reflect lighting, camera white balance, or surface residue rather than true physiological condition. Avoid concluding viability from hue without pairing it with shape and texture evidence.
Gloss or sheen can be misleading. A glossy seed surface sometimes indicates a healthy cuticle, but dust, oils from handling, or surface mold can mimic shine. Similarly, a seed that looks ‘fresh’ in a well-lit macro might still be hollow inside. When color or sheen is the only positive sign, follow up with a float or germination check before relying on the seed for planting.
One-angle photos and dramatic close-ups hide context. A single macro image that fills the frame with one face of a seed doesn’t show the seam, the base where it attached in the pod, or opposite-side damage. Multiple modestly framed shots—showing the whole seed, the seam or hilum, and the seed in relation to a ruler or coin—are far more useful than a single dramatic close-up.
Assuming species from appearance alone is risky. Many seeds share a generic oval, winged, or flattened look and are common lookalikes (for instance, some grass caryopses versus small weed seeds). If you must hypothesize a species, treat it as a research lead rather than a confirmation of viability or suitability for planting.
- Color alone is unreliable — lighting and age influence hue.
- Glossy surface can be residue or mold, not health.
- Single-angle photos hide damage on the unseen side.
- Assumed species identifications from shape alone create false confidence.
- Dry weight and hardness need tactile checks—photos can’t show internal density reliably.
Comparison workflow for a seed viability test
Combine clues rather than relying on one. Start by photographing several seeds from the same batch: a top-down view, a side profile, and a close crop of the seam or attachment point. Use these images to sort seeds into ‘likely viable,’ ‘uncertain,’ and ‘likely non-viable’ piles. The likely viable pile should show intact coats and plump shapes across multiple seeds; the uncertain pile will have mixed signs.
Next, run a quick float test on the uncertain and likely non-viable groups. Place seeds in clear water for 10–20 minutes, then transfer floating seeds to a towel and let them dry. Remember that some viable seeds sink only after rehydration; treat float tests as suggestive, not definitive. Keep notes or photos of which seeds floated and which sank so your germination trial can include both sinkers and floaters for comparison.
A small germination test is the decisive comparison. Take 10–25 representative seeds from each pile, place them between damp paper towels or in starter plugs under consistent warmth, and check daily. Record the germination rate for each category after the commonly expected timeframe for that species (often 7–21 days). Comparing rates between your ‘likely viable’ and ‘uncertain’ piles will quantify how well visual clues predicted success.
Interpret results with species context. Some seeds have dormancy mechanisms—hard coats, physiological dormancy, or light-sensing requirements—that delay or prevent germination under simple conditions. If your germination rate is low across all piles, research species-specific pre-treatments (scarification, cold stratification) before discarding a batch as non-viable.
- Photograph multiple seeds from different angles to create comparison sets.
- Sort seeds visually into likely viable / uncertain / likely non-viable groups.
- Float test for a quick triage, then a 10–25 seed germination trial for proof.
- Record and compare germination rates by visual group to validate photo cues.
- If germination is low, investigate dormancy-breaking treatments before discarding.
App steps after a seed viability test
After you gather visual clues and run simple checks, use an identification tool as a second opinion to help interpret ambiguous seeds. Seed Identifier - Seedio can help correlate visible traits—shape, surface texture, and pod context—with likely species matches, which in turn guides species-specific viability expectations like dormancy, expected seed size, or recommended germination conditions.
When using an identification app, present the app with a short photo set: one whole-seed photo showing scale, one close-up of the seam or hilum, and one image of the pod or parent plant when available. Explain collection context in the note field if provided: collection date, location, habitat type, and whether seeds were fresh or previously dried. These details materially affect whether a match suggests seeds will germinate easily or need pretreatment.
Treat app results as supportive research notes rather than proof. If the app indicates matches with species known for physiological dormancy or hard seed coats, prioritize a germination trial with the recommended pre-treatments. If the app points to a species with tiny, fragile seeds (for example, some grass spikelets), understand that germination trials demand different handling and sowing depth compared with larger seeds.
If you want more reading tied to specific seed shapes and pods, consult visual guides that focus on those plant types. Articles such as Grass Seed Heads: Spikes, Panicles, Awns, and Seed Clues and Milkweed Seed Pods: Shape, Fluff, Seeds, and Timing Clues provide extra context that helps interpret app suggestions and decide which viability checks to run next.
- Provide multiple photos and collection context when asking the app for help.
- Use app suggestions to guide which germination pretreatments to try.
- Keep app matches as research notes, then validate with a small germination trial.
- Refer to species-specific guides for pod and seed context when needed.
Related guides
Try Seed Identifier - Seedio as a research step
After you complete visual sorting, a float check, or a small germination trial, use Seed Identifier - Seedio to organize photos and compare likely species matches. Treat app matches as research notes: they help pick sensible germination conditions or dormancy treatments but don’t replace a germination test. If a match suggests a species with hard coats or special pretreatments, run a targeted trial next. Seedio is a useful next-step tool to clarify which checks are worth your time and help you track results from multiple batches.
Take the next step →Frequently asked questions
How long should I run a germination trial to test viability?
Run a germination trial for at least the commonly expected window for the species—many garden annuals and vegetables germinate within 7–14 days, while some wild plants require 21–30 days or more. If seeds are known to have dormancy (hard coats or physiological dormancy), you may need pre-treatments like scarification or cold stratification and to extend the observation period. Use 10–25 seeds per trial for a quick viability percentage; smaller sample sizes give less precise rates but are still useful when seed quantity is limited.
Does a floating seed always mean it’s dead?
No. A float test separates many hollow or insect-damaged seeds from denser ones, but it isn’t definitive. Very dry but viable seeds can float initially and later sink after rehydration; some viable seeds have low density for species-specific reasons. Use float tests only as a quick triage: follow up with a germination trial on both sinking and floating seeds before discarding any batch, especially if seeds are scarce or have been collected recently.
Can I tell viability from seed color or sheen in a photo?
Color and sheen are poor stand-alone indicators. Lighting, camera settings, and surface residues change apparent color; sheen can come from oils or surface mold. Use color and gloss as supporting cues when combined with structural signs like an intact seed coat and plump shape. When in doubt, sort seeds by visual type and run germination tests across the categories to see which visual traits truly predict success for your material.
What should I do with seeds that look damaged but might still sprout?
If seeds show minor surface scarring but the embryo region appears intact, include a subset in a germination trial rather than discarding immediately. Keep records of which seeds you test and their visual categories so you can learn which damage types are lethal and which are cosmetic. For seeds with clear pest entry holes, frass, or soft moldy patches, it's safest to discard them to avoid spreading pests or pathogens in your growing media.