

Seed Identification
Ash Tree Seeds: How to Identify and Compare Samaras
Learn to identify ash tree seeds using visible clues, seasonality, and lookalike checks. Practical photo tips and safe next steps for gardeners.
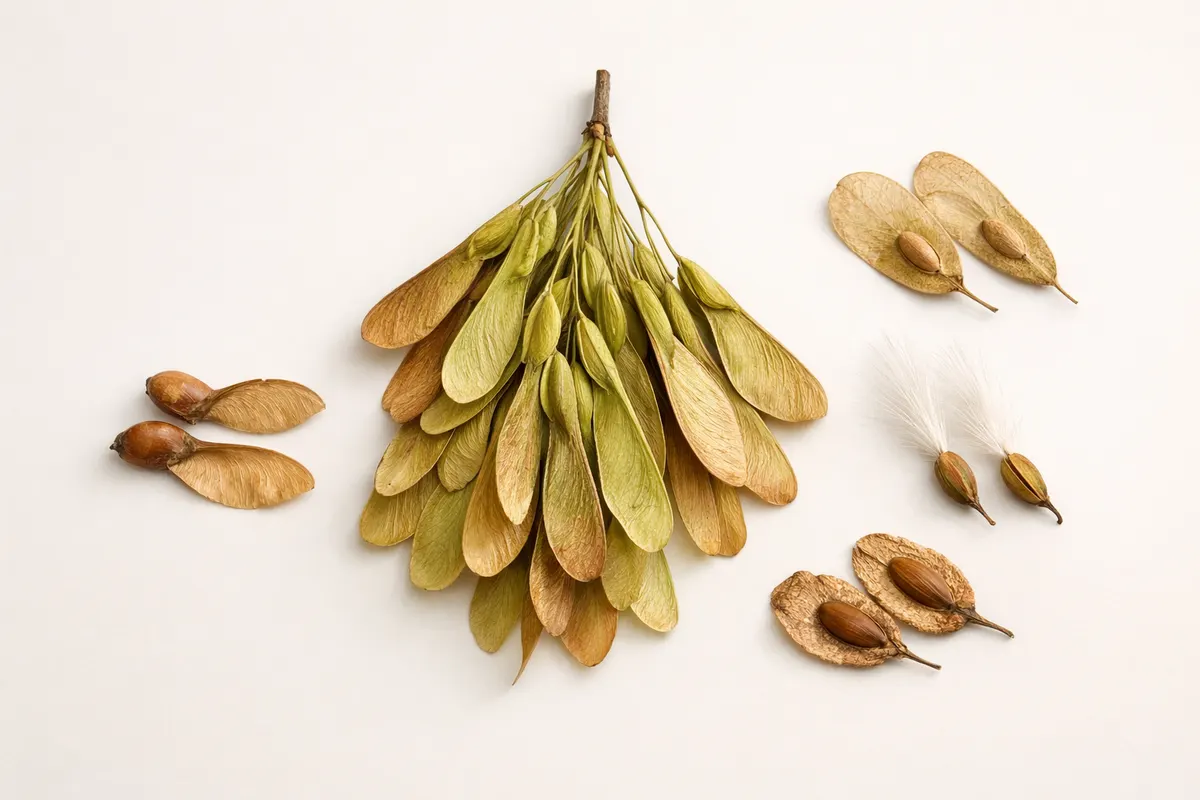
What ash tree seeds are and why they matter
Ash tree seeds are the single-winged samaras produced by trees in the genus Fraxinus. Each seed sits in the center of a flattened, elongated wing that helps it spin and travel on the wind. The winged seeds are commonly called samaras, and ash samaras are a distinctive part of the tree’s reproductive cycle from late summer into autumn.
In most temperate zones, mature ash samaras range from about 2 to 5 cm long (including the wing) and are attached in clusters on the branches. The seed body is typically a small, hard nut at one end of the wing; the rest is a papery, fibrous membrane. While many ash species have similar overall shapes, differences in size, curvature, and attachment can hint at species or origin.
For gardeners and naturalists, recognizing ash tree seeds helps with tree identification, planning where seeds might germinate, and making informed choices about collecting and labeling specimens for later comparison. Always note that a clear photo of the samara plus branch or leaf context is more reliable than a lone seed on the ground.
- Common name: ash samara or ash tree seed (genus Fraxinus).
- Typical length: 2–5 cm including wing; nut at one end.
- Season: seeds ripen and fall from late summer through fall in many climates.
- Function: wind-dispersed seed with a single elongated wing.
How can you confirm an ash tree seed in a photo?
Start with the samara’s overall outline. Ash tree seeds usually have a long, narrow wing with a slightly widened or rounded seed at one end. In photos, look for a distinct seam where the seed meets the wing and a wing that is more blade-like than the round, paired wings you see on maples.
Examine the wing texture and venation. Ash samaras often show a central midrib with faint parallel veins running toward the edges; the surface can be papery, sometimes translucent near the thinner edges. Damage, drying, or insect chew marks change appearance, so note fresh versus weathered state.
Include context: capture the attachment point, nearby leaves, or the seed cluster. Ash leaves are pinnate (multiple leaflets on a single leaf stalk); seeing even one leaflet in the frame makes identification far more certain. If you can photograph the petiole or a bit of bark along with the samara, that helps too.
Use scale and focus. Place a coin or ruler beside a seed for size reference and take a close-up that shows the seed’s edge and the nut. If you plan to compare multiple possibilities, photograph both sides of the wing and any color differences between the seed and wing.
- Look for a single elongated wing with the seed at one end, not two paired wings.
- Check wing venation: central midrib and faint parallel veins toward the margin.
- Capture leaflets or branch attachment to confirm pinnate leaves typical of ash.
- Note season and condition: fresh samaras differ from browned, dried ones.
Key facts and quick reference for ash tree seeds
This quick facts table summarizes size, color, habitat, season, and the distinguishing feature to check in photos. Use it as a checklist when you review a close-up image or a group of fallen seeds.
Remember that regional variation occurs: different Fraxinus species and local growing conditions change size and hue. The table below lists typical values and what a gardener should photograph to confirm them.
| Attribute | Typical | Photo clues / Notes |
|---|---|---|
| Length (wing + seed) | 2–5 cm | Photograph with scale (coin/ruler) to show size |
| Color | Green to tan, browning with age | Fresh samaras translucent near edges; weathered look is brown/dull |
| Wing shape | Long, narrow, blade-like | Single wing with seed at one end—contrast this with paired wings |
| Leaf association | Pinnate leaves (multiple leaflets) | Capture a leaflet or petiole to confirm ash leaf structure |
| Season | Late summer to autumn | Note collection date; many fall when mature and dry |
- Keep a small label with date and location when you collect a specimen to help later comparison.
- If you plan to germinate seeds, test a few for viability rather than assuming all are fresh.
Where and when you'll encounter it
Ash tree seeds are most noticeable from late summer through fall when mature samaras detach and fall to the ground. They are often found in clusters beneath mature ash trees, along sidewalks under canopy gaps, and in meadows downwind of wooded edges.
Range depends on the species: common ash species occur across North America, Europe, and parts of Asia. Urban plantings, riparian zones, and mixed hardwood forests are common habitats. In towns you’ll frequently find samaras on pavement, in gutters, and washed into storm drains after wind events.
Timing and microclimate matter. In warmer climates seeds may mature earlier in late summer; in cooler areas, peak season can be mid- to late autumn. Heavy rains and windstorms accelerate fall to the ground, so check trees after blustery weather.
| Region / Habitat | When you’ll see it | What you’ll notice |
|---|---|---|
| Urban street trees | Late summer–autumn | Clusters under crown; many stuck in gutters |
| Riparian and riverbanks | Late summer–autumn | Abundant samaras washed into gravel bars and edges |
| Mixed hardwood forests | Autumn | Scattered beneath trees, often mixed with other seeds |
| Open fields near woods | Late summer–autumn | Windblown samaras collected in low spots or fence lines |
- Look under canopy edges and along fences where seeds collect.
- Check sidewalks and gutters after windy days for concentrated samara deposits.
- Photograph in situ before moving seeds—attachment and leaf context are diagnostic.
Seeds and samaras often mistaken for ash
Several winged seeds look similar at a glance. The most common confusion is with maple samaras (the paired ’helicopters’) and with some ash-lookalikes that have different wing shapes. A focused photo of wing attachment, venation, and any nearby leaflets resolves most mistakes.
When comparing possibilities, photographing a single seed plus the branch or a leaflet is far more useful than a pile of fallen seeds. If you want a direct comparison to maples, the site’s Maple Samara guide gives side-by-side photos that highlight paired versus single wings.
- Maple samaras: usually paired and more rounded; see Maple Samara: Identify Maple Seeds and Their Lookalikes (https://seedidentification.app/wiki/maple-samara).
- Elm or ash-lookalike samaras: elm seeds are rounder with a circular wing; photograph the seed’s silhouette to tell them apart.
- Willow or poplar fluff: these have cottony fibers rather than a single wing; texture in macro photos is a clear difference.
Care and handling
If you collect ash samaras for study or planting, handle them gently: the wing membrane tears easily and damage can obscure venation clues used in identification. Store samples flat in a labeled envelope with date and location rather than plastic bags that trap moisture and encourage mold.
For planting, most ash seeds benefit from a period of cold stratification to break dormancy—simulating winter conditions for several weeks. If you only want to confirm identity, a few photos and a small labeled sample are enough; avoid moving large quantities of seed between regions to prevent accidental spread.
Be cautious about legal and ecological limits: in some areas ash species are subject to pest control or quarantine due to invasive pests and diseases (for example emerald ash borer). Do not assume collecting or transporting seeds is permitted—check local regulations before moving specimens off-site.
- Label samples with date, precise location (GPS if possible), and tree notes (leaf, bark).
- Store dry samaras in paper envelopes at cool room temperature for short-term reference.
- Check local rules before transporting seeds—some regions restrict movement due to pests.
Frequently asked questions
How do I use ash samara identification to check a seed photo I found?
Start by photographing the seed with scale and include any nearby leaflets or the branch tip. In the photo look for a single elongated wing with a small rounded seed at one end, a central midrib, and faint parallel veins. Note the season and location, and compare the photo against known ash samara examples: leaflets in frame or a pinnate leaf stalk are the most reliable photograph clues.
Ash vs maple seeds: How can I tell which winged seed I found in my yard?
Maple seeds are typically paired samaras attached like a V (two wings together) and spin as they fall; ash seeds are single-winged with the seed at one end of a narrow blade-like wing. Photograph the attachment point and any leaves nearby: paired wings and palmate leaves indicate maple, while a single wing plus pinnate leaflets points to ash.
Can I identify ash tree seeds from a single photo on the ground alone?
A single ground photo can be suggestive but often isn’t definitive because weathering obscures wing venation and you lose branch or leaf context. If you can, take a close-up with scale and at least one in-situ shot showing where the seed fell relative to the tree or leaves. If you only have ground photos, note color, shape, and size, and treat any ID as provisional.
Is it safe to collect ash samaras for planting or study near my home?
Collecting a few samaras for study is usually safe, but check local regulations first—some areas restrict movement of ash material because of pests like emerald ash borer. Store samples dry and labeled; if you intend to sow them, follow local guidelines for stratification and avoid introducing seeds into wild areas where they might escape cultivation.
Related guides
Compare your photo to ash tree seed clues with Seed Identifier - Seedio
If you’ve taken photos, use Seed Identifier - Seedio as a first-pass comparison against the visual clues on this page. The app can help highlight matching features in your image and suggest likely matches, but treat its result as a starting point—combine it with leaf and branch photos for stronger ID. Visit https://seedidentification.app/ to try the site’s photo-identification workflow and to learn recommended next photos to take before you decide what to label or plant.
Take the next step →