Plant Seed Identification: How to Recognize Seeds Before You Plant
Practical plant seed identification advice using shape, size, seed coat, and context. Learn which photos reduce ambiguity and safe next steps before you plant.
Quick answer for plant seed identification
Plant seed identification by photo is often possible to a useful level: a clear image can show shape, relative size, surface texture, and attachment points (hilum or raphe), which together eliminate many candidate families. Those visible clues let you separate broad groups—grasses, legumes, achenes (dandelion-style), winged samaras, and larger tree seeds—before you plant.
A single photo rarely proves a species. Color shifts with light and age, tiny surface structures need close-ups to read, and many seeds require contextual clues—pods, fruit, or the parent plant—to be certain. Treat a photo as a high-quality hypothesis, not a final verdict.
To increase confidence, pair photos of the seed with context: how it was attached, the fruit or pod it came from, and a clear scale. After those photos you can often decide whether to plant a harmless trial, hold for verification, or consult local experts when a seed could be invasive, regulated, or potentially toxic.
- Make this section specific to plant seed identification.
- Use concrete examples, not reusable boilerplate.
Photo checklist
Good photos are the single biggest factor in improving identification. Aim for multiple, focused shots that together show the whole seed and its telling details.
Before you scan or consult an app, take photos that answer the basic questions: What shape is it? How big is it? What is the surface like? Where did it come from?
If you have several seeds from the same source, photograph them all. Variation between seeds (size, color, damage) can be diagnostic and helps rule out random debris.
- Whole-seed shot: a clean photo of the entire seed on a neutral background (white, gray, or natural wood).
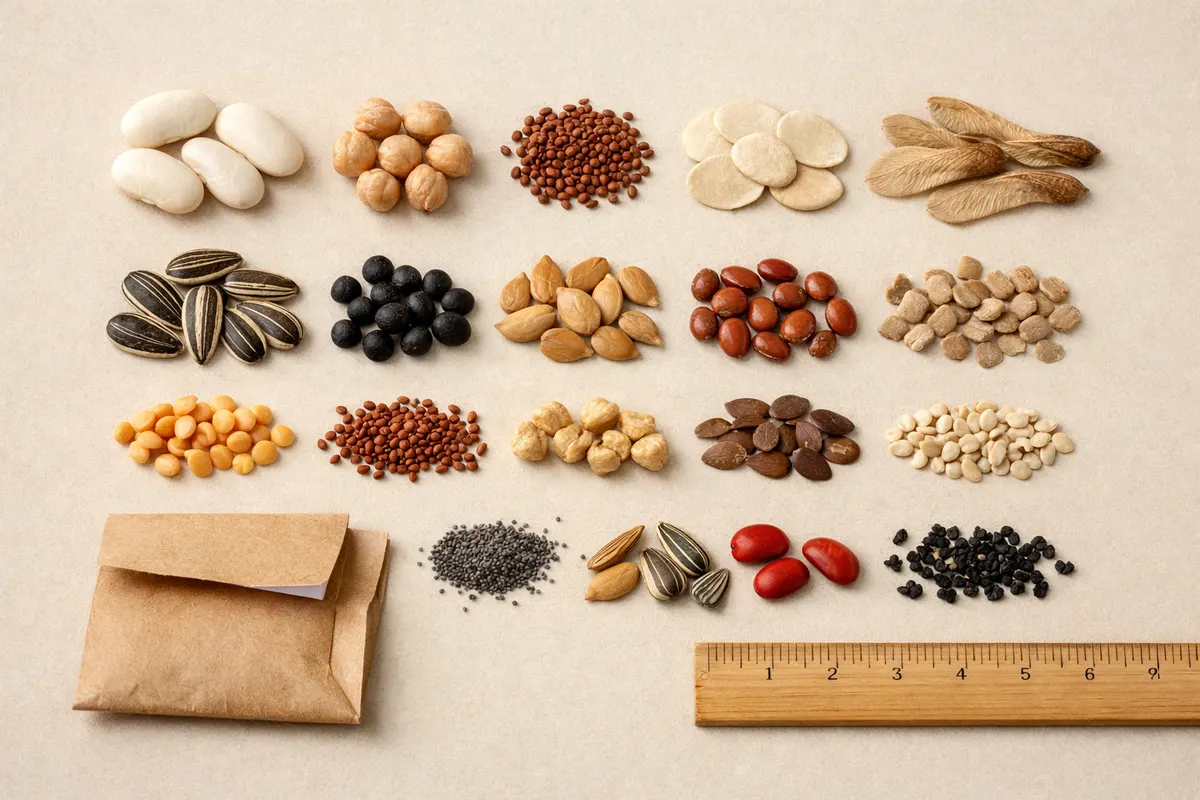
- Scale reference: include a ruler or a common object (coin, paperclip) placed flat next to the seed for size comparison.
- Close-up of surface: a tightly framed macro that shows texture (smooth, pitted, hairy, ridged) and any patterns or mottling.
- Attachment view: a photo of the hilum/raphe or any spot where the seed was attached to a pod or fruit.
- Context photo: the plant, pod, fruit, or location where the seed was found—this often resolves lookalikes.
- Multiple angles: flat, edge, and back views reveal wings, flattened shapes, or creases that are invisible from one side.
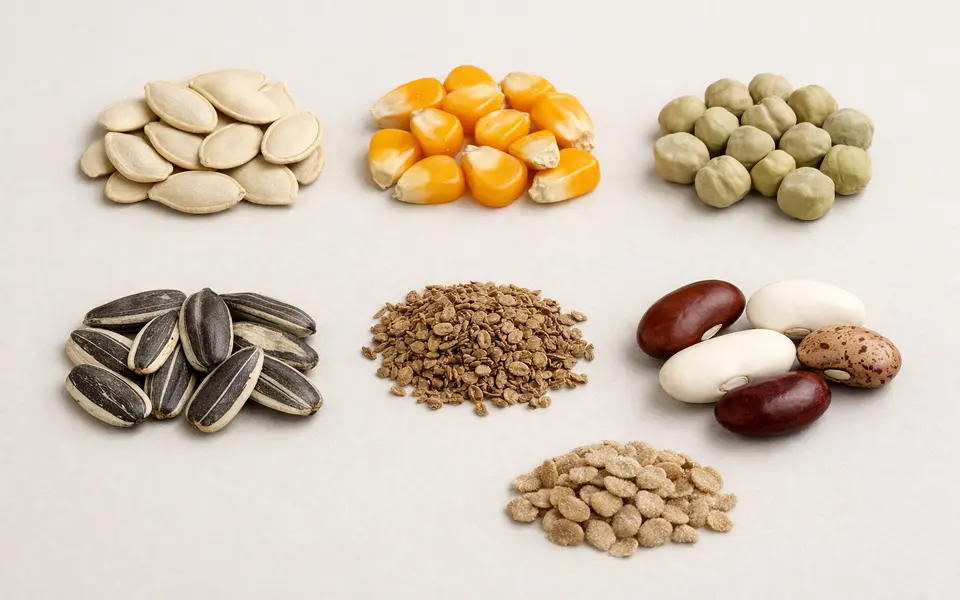
- Group shot: several seeds together highlight consistent shape or size; note if some seeds look like fragments or debris.
- Lighting: use diffuse daylight or indirect light. Avoid strong shadows or color casts from artificial bulbs.
Visual clues
Start with the big-picture traits: shape and size. Kidney-shaped, spherical, elongated, or flat seeds immediately point toward families: legumes tend to be bean-like, grass seeds are linear or lanceolate, and achenes are often small and asymmetrical.
Surface texture and coatings are next-level clues. A glossy, smooth coat often indicates a hard outer testa (many tree seeds), whereas a rough, pitted, or fuzzy surface can point to composites or plants that use pappi for wind dispersal. Tiny hairs, ridges, or corky wings are strong identifiers.
Attachment marks and specialized appendages matter. The position and shape of the hilum (the seed scar) can separate closely related genera. Wings, arils, hairs, or tufts (pappi) determine dispersal type and help eliminate incompatible matches—winged seeds are rarely legumes, for example.
- Shape: round, ovoid, kidney-shaped, compressed, or winged—each suggests different plant families.
- Size: millimeter-scale vs several centimeters; measure with your scale reference.
- Surface: smooth, glossy, pitted, hairy, or wrinkled—note any repeated pattern.
- Color & pattern: uniform, mottled, or banded—use cautiously as it fades with age.
- Attachment point: hilum size/position and presence of a raphe or micropyle.
- Appendages: wings, arils, hairs, or pappi that aid dispersal and narrow candidates.
Examples by type
Grasses and cereals: usually narrow, elongated seeds (caryopses) often with a shiny surface and a clear groove; size ranges from tiny lawn grass seeds to larger oats. Context—seed heads or spikelets—confirms them quickly.
Legumes (peas, beans, vetch): typically rounded to kidney-shaped with a smooth, often glossy coat and a visible hilum scar along one edge. Pods that split along two sutures are a confirming clue—if you have a pod photo, see Seed Pod Identification by Photo: How to Read Pods, Seeds, and Plant Clues for pod-specific signs.
Achenes and composites (dandelion, sunflower): small, often one-seeded dry fruits with a distinct attachment point. Look for flattened shapes, ridged surfaces, or a tuft for wind dispersal (pappus). Sunflower 'seeds' are large achenes with a characteristic striped testa.
Tree seeds and nuts (acorn, walnut): larger, often hard-coated seeds with a prominent cap or fruit remnant. The presence of a cupule (acorn cap) or a husk helps separate them from similarly sized seeds that lack these structures.
Winged samaras (maple, ash) and helicopter seeds: asymmetrical, flattened wings for wind dispersal; photographed edge-on they can look like thin leaves, so capture the profile to show wing width and attachment.
- Make this section specific to plant seed identification.
- Use concrete examples, not reusable boilerplate.
Compare likely matches
When multiple candidates look similar, combine clues rather than relying on one feature. For example, two seeds might both be small and brown; check surface texture, the exact outline, and attachment marks to decide between a grass seed and a tiny legume.
Use exclusion: if a seed has a wing, rule out families that never produce winged diaspores; if it has a tuft of hairs, prioritize composites. Contextual evidence—was the seed inside a pod, attached to a fruit, or lying loose on a dried seed head—often settles close matches.
If visual clues remain ambiguous, behavioral tests and secondary evidence help separate matches. Germination behavior, seed coat hardness (float test or nick test for hard-seeded legumes), and the emerging cotyledon shape are diagnostic but require time and care.
- Look for combined traits: shape + texture + hilum > any single trait alone.
- Check the parent structure: pod = likely legume; husk = often grass or cereal; wing = samara/ash/maple.
- Use size categories: tiny (<2 mm), small (2–6 mm), medium (6–12 mm), large (>12 mm) to reduce candidates.
Common mistakes
Relying on color alone is risky. Photographic lighting, seed age, and storage all alter color. Instead, emphasize shape and texture, which are more stable across time and conditions.
Failing to include scale creates avoidable ambiguity. A seed photographed without a reference can be misread by an entire size class—what looks 'small' could be large if the photo lacks scale.
Assuming a seed’s origin without checking attachments or nearby plant parts leads to misidentifications. Seeds found in compost, bird feeders, or mixed debris can belong to several species; context photos reduce false conclusions.
- Blurry macro shots that hide texture and hilum detail.
- Single-angle photos that miss wings or flattened profiles.
- Mixing damaged fragments with intact seeds and drawing conclusions from fragments alone.
- Presuming edibility, toxicity, or legal status from a visual ID.
App workflow
Use the app as a systematic second pair of eyes after you’ve taken the checklist photos. Start with the whole-seed shot, add close-ups and context images, and then submit the set for comparison. The app's suggested matches are hypotheses you should vet with the same visual clues used above.
Treat app matches as prioritized suggestions: compare the app’s top results against your notes on shape, size, surface, and attachment. If the top match aligns with your photos on multiple independent clues, your confidence increases; if not, retake photos emphasizing the missing detail.
Seedio can store your image set and match history so you don’t lose context when you return later to verify germination or consult an expert. Use that history to track which visual clues ultimately predicted correct IDs and to build a local reference for similar future finds.
- Make this section specific to plant seed identification.
- Use concrete examples, not reusable boilerplate.
Next steps by confidence level
High confidence: multiple photo clues match a single species and context agrees. You can proceed with a small trial planting in a controlled area, label the tray with the photo and date, and monitor seedlings to confirm identity. Keep records of germination time and seedling traits.
Partial confidence: some clues match, but ambiguity remains between similar species. Perform a controlled germination test in a pot, compare emerging cotyledons and early leaves to field guides, and consider reaching out to a local extension office or seed club with your image set for confirmation.
Low confidence or risky seed: if the seed could be invasive, regulated, or potentially toxic, do not plant it in open soil. Instead, preserve the sample in a labeled bag, avoid disposing it in compost that could spread it, and consult regional plant authorities or a university extension for testing and advice.
- Keep a labeled record of photos, source location, and any notes about where it was found.
- For verification, compare seedlings to authoritative regional keys rather than relying on memory.
- Contact local extension services, botanical gardens, or herbarium staff when you need a definitive ID.
Limitations
Even with excellent photos, some species cannot be reliably separated at the species level from seed appearance alone. Closely related species often have near-identical seeds; flowers, leaves, and genetic tests are sometimes required for confirmation.
Do not assume viability, edibility, or safety from a photo. Seed age, storage conditions, and hidden toxins are invisible. Treat found seeds cautiously: wash hands after handling and keep unknown seeds away from children and pets until verified.
When legal or conservation concerns apply—protected species, quarantine-regulated plant material, or suspected invasive weeds—stop at photo-based hypothesis and consult the appropriate authority before transporting or planting the seed.
- Separate high-confidence, partial, and uncertain outcomes.
- Tell the reader when to verify with a trusted source or professional.
Use Seedio after you check the visible clues
Once you’ve photographed shape, size, attachment, and surface detail, try Seed Identifier - Seedio on iOS as a first-pass check. Compare the app’s suggestions against your photos and only act when multiple clues and local guidance support the ID.
Frequently asked questions
Can I identify a seed species from one photo?
A single photo can often narrow the family or likely group, but it rarely proves species-level identity. Use multiple angles, scale, and context for a reliable ID; for some taxa you’ll still need flowers, fruit, or expert analysis.
How should I measure seed size accurately in a photo?
Place a ruler or a familiar object (coin, paperclip) flat beside the seed and make sure both are in the same focal plane. Note the measurement in millimeters if possible and capture the image straight-on to avoid perspective distortion.
What’s the difference between a seed, a nut, and an achene?
‘Seed’ is the broad term; a nut is a large, hard-seeded fruit (acorn, hazelnut) often with a husk, while an achene is a small, dry, one-seeded fruit (sunflower ‘seed’ is an achene). The outer structures and how they detach help tell them apart in photos.
Is it safe to plant seeds I find in my yard?
Many garden seeds are harmless, but if you’re unsure—especially with seeds from unknown sources, mixed debris, or near roads and compost—test them in isolated pots first and avoid introducing species that could be invasive or regulated in your area.