

Acorn Identification: Caps, Shells, Shape, and Oak Tree Clues
Learn acorn identification from cap pattern, shell shape, tree context, and reliable photo clues. Practical checklist, common lookalikes, and safe next steps.
Quick answer: what visible clues matter most
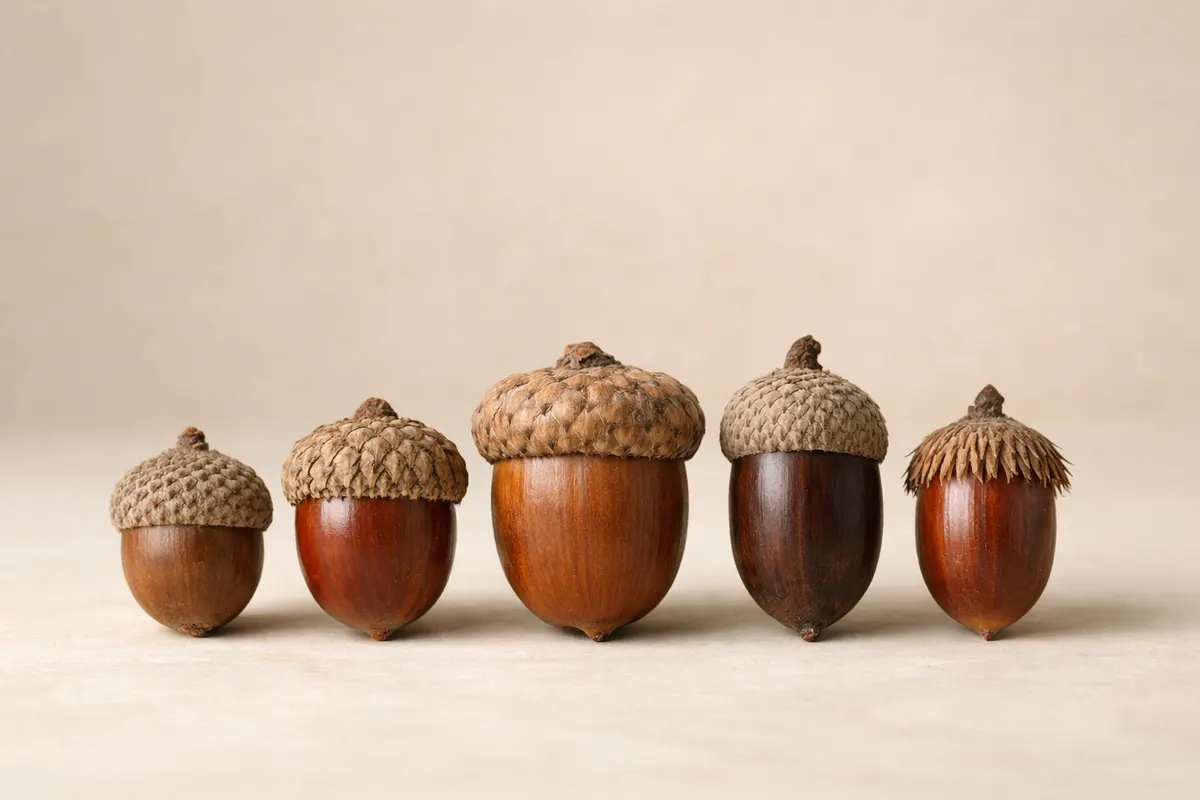
Acorn identification starts with the cap, shell shape, size, and the tree or branch the nut came from. These visible features together often let you place an acorn into a broad oak group—white oak group, red/black oak group, or one of the smaller localized groups—without claiming a final species-level ID from a single photo.
Caps are the single most diagnostic part you can usually capture in a phone photo: look for the cap’s texture (scaly, knobby, fringe-like), how much of the nut it covers, and whether it forms a tight cup or a shallow saucer. Shell or nut shape—rounded, elongated, or sharply tapered—adds a strong second clue.
Size and proportion matter but are best used with a scale reference—coin, ruler, or a finger—because acorn size overlaps across species. Finally, the tree context (leaf shape, twig texture, and whether the acorn fell clustered or singly) often seals the likely oak group. Together these clues support a confident group-level identification while leaving species confirmation to additional evidence.
- Cap texture and coverage: primary visual clue that survives most photos.
- Shell shape: round vs. tapered helps separate white oaks from red/black oaks.
- Size with a scale reference: supports but rarely proves species identity.
- Tree context: leaves, twig, and how acorns are attached or clustered refine the match.
Strong visual clues that survive phone photos
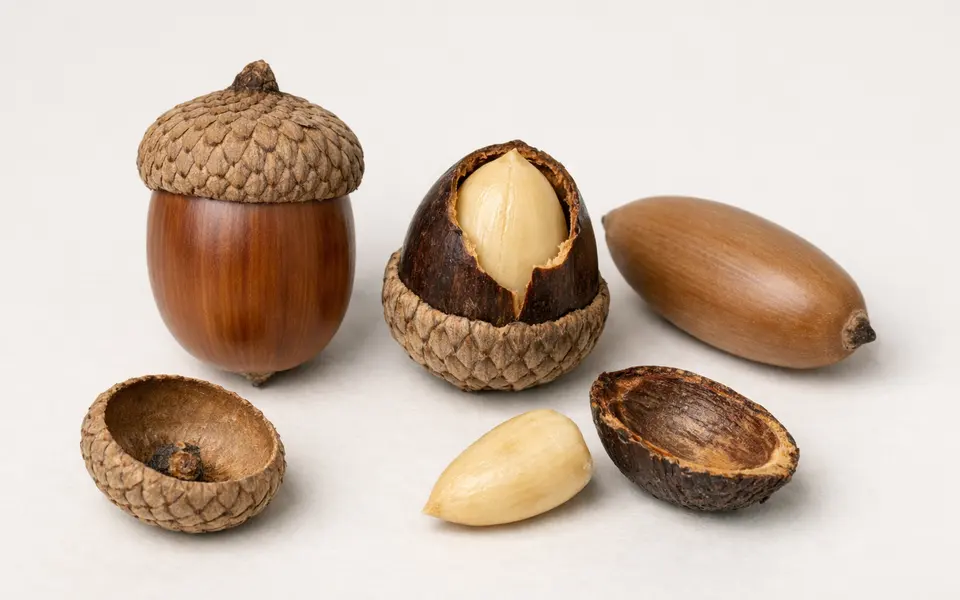
When doing acorn identification from images, prioritize clues that remain visible even with soft focus or shadow. The cap’s surface—whether it’s composed of overlapping scales, shaggy hairs, or tight knobby plates—is usually visible in moderate-quality photos and is one of the best single predictors of oak group.
Shell shape and tip profile are also robust. White-oak-group acorns tend to be more rounded or blunt-tipped, while red/black-oak-group acorns often show a pointed or angular tip when mature. Look at the acorn from multiple angles when possible; the silhouette (round versus tapered) holds up under different lighting better than subtle color shades.
Attachment and cluster pattern on the branch can be decisive. Many red oaks produce single acorns on short stalks or clusters of a few, while some white oaks have multiple acorns that mature together on a thicker stalk. Photograph the base where the acorn met the twig if it’s still attached or capture nearby acorns to show the typical arrangement.
Additional stable cues include cap margin (does the cap cover all the way to the nut base or just the top third?), cap fringe or ‘bristles’ visible at the edge, shell ridging (smooth versus lightly ribbed), and scars left by squirrels or insects—these latter features help rule out damaged specimens or lookalikes.
- Cap surface: scales, knobby plates, or shaggy hairs—visible in most phone photos.
- Cap coverage: full cup, partial cup, or saucer-like cap narrows the group.
- Nut silhouette: round/blunt vs. elongated/pointed is a strong separator.
- Attachment pattern: single, paired, or clustered on the twig provides tree-level context.
- Cap edge details: fringes, bristles, or smooth margins survive moderate blur.
Weak signals
Color alone is a poor basis for acorn identification. Lighting, ripeness, and superficial weathering change hue dramatically: immature acorns can be green, maturing ones brown, and older nuts bleached gray. Do not rely on shade or chestnut color as a primary clue unless you have multiple photos under consistent light.
Surface sheen and small-scale texture are easy to misread in phone photos. Gloss from wetness or glare can hide cap detail; compression artifacts or shallow depth of field can blur cap scales into a generic texture. If the cap looks 'fuzzy' in an image, check a different angle or a close-up rather than assuming the species has a hairy cap.
Single-angle photos hide silhouette cues. A top-down shot may exaggerate cap coverage; a single side shot can hide tapering at the nut tip. Always try at least two angles: a clear side profile that shows the shell outline and a three-quarter or top view that reveals cap coverage and edge details.
Small seedlings, galls, or other tree nuts can be mistaken for acorns in quick photos. Similarly shaped nuts from unrelated trees or shrub species (some chestnuts, beech nuts, or introduced ornamental species) occasionally mimic acorn size and shape. Use twig, leaf, and cupule details to rule out lookalikes.
- Don’t trust color without consistent lighting or multiple images.
- Avoid conclusions from a single angle—get a side profile and a top/angled shot.
- Glare, wet sheen, and image blur can hide cap texture and scale patterns.
- Check leaf or twig context to disambiguate lookalikes like chestnuts or beechnuts.
Comparison workflow
Start with the cap. Compare the cap’s coverage and texture to known group patterns: white-oak-group caps often form shallow cups with overlapping scales and may cover less of the nut, while many red-oak-group caps are thicker and may show distinct bristles or coarser scales. Use clear photos of the cap edge and a close-up of the cap surface for this step.
Add shell silhouette and tip shape. If the nut is blunt, more spherical, and the cap is shallow, lean toward white oak relatives. If the nut shows a pointed tip and the cap is rough or bristled, the red/black oak group is more likely. When both cues conflict, treat the result as an ambiguous match and gather tree details.
Check attachment and cluster data next. Photograph or note whether acorns were solitary, paired, or in clusters. Also note if they fell singly from tall trees or in bunches beneath a low branch. Many species have predictable attachment patterns that narrow possibilities significantly.
Integrate tree-level clues: leaves, bark, and habitat. Oak leaf shape (lobes rounded vs. pointed), bark texture, and whether the tree is in dry upland or moist lowland habitat all change which oak species are plausible in a given area. If leaves are present, include a clear photo—leaf lobing is often the decisive tie-breaker.
Use a ranked comparison approach. Create a short list of 2–4 likely groups or species, note which clues support each candidate, and mark which clues you’re missing. That checklist tells you whether a photo is sufficient or if you need a twig, leaf, or multiple acorns to make a stronger claim.
- 1) Cap: texture and coverage (close-up photo).
- 2) Shell silhouette: round vs. tapered (side profile).
- 3) Attachment: solitary, paired, or clustered (branch photo).
- 4) Tree context: leaf shape and bark (environment photo).
- 5) Rank candidates and list missing clues before declaring a likely match.
How to use Seedio after you collect visual clues
After you’ve documented cap texture, shell shape, attachment, and a leaf or twig where possible, use Seed Identifier - Seedio as a next-pass tool to compare visual matches. Seedio is helpful for prioritizing likely oak groups when you already have the core visible clues; think of the app as an assistant that amplifies your photo-based checklist rather than a final arbiter of species identity.
When scanning in the app, include at least two photos: a close-up of the cap edge and a side profile showing the nut silhouette. Add a third image of the twig or a leaf if available. These multiple perspectives help the app’s algorithms weigh cap detail and shell shape separately and give you more reliable candidate suggestions.
Treat the app results as probabilistic. Seedio can suggest likely groups or visually similar acorns, but species-level confirmation often requires leaf shape, mature tree context, or expert verification. If your acorn looks unusual—damaged, insect-peeled, or unusually small—note those caveats before interpreting the automated suggestions.
If you want more background on reading other seed and pod clues, our guides on flower seed identification and seed pod identification offer compatible workflows and photo-checklists that apply to many tree and plant seed types. See Flower Seed Identification by Photo: How to Identify Flower Seeds and Seed Heads (https://seedidentification.app/blog/flower-seed-identification-by-photo) and Seed Pod Identification by Photo: How to Read Pods, Seeds, and Plant Clues (https://seedidentification.app/blog/seed-pod-identification-by-photo) for related techniques.
- Take at least two photos: cap close-up + side profile; add twig/leaf photo if possible.
- Use the app to prioritize likely groups, not to claim final species identity.
- Flag unusual features (damage, insect holes, deformities) before scanning.
- Consult related seed guides for complementary photo techniques (links above).
Related guides
Ready to compare your acorn photos with Seedio?
Note the cap pattern, take a side profile and a twig or leaf shot, then scan the set with Seed Identifier - Seedio. The app will surface likely oak groups and visually similar acorns to help you prioritize matches—keep in mind results are probabilistic and work best when you include cap coverage and tree context.
Take the next step →Frequently asked questions
Can I identify the exact oak species from one acorn photo?
No—one acorn photo rarely proves a species. A single nut can narrow the likely oak group (for example, white oak group vs. red oak group) when cap structure, nut shape, and tree context align, but species confirmation usually needs leaves, multiple fruits, or habitat details. Treat any species-level result from a single image as provisional and seek additional photos or local references to confirm.
Which cap features are most diagnostic for oak groups?
Cap texture and coverage are the most diagnostic. Look for whether the cap is composed of tight overlapping scales, coarse plates, or hairy/bristled margins, and note how much of the nut the cap covers. These traits tend to persist in photographs and are reliable clues for separating major oak groups when combined with nut shape and attachment.
How should I photograph an acorn for best identification results?
Take a side profile showing the nut silhouette, a close-up of the cap edge and surface, and a wider shot that includes the twig or fallen position with a scale reference (coin or ruler). Avoid harsh backlighting, hold the camera steady for a sharp cap close-up, and capture leaf or bark if available. Multiple angles reduce ambiguity from a single distorted view.
Are there lookalikes I should watch out for when identifying acorns?
Yes. Some chestnuts, beech nuts, or ornamental tree seeds can mimic acorn size and shape in casual photos. Also damaged or insect-eaten acorns can be mistaken for a different type. Use twig attachment, cupule structure, and nearby leaves to rule out lookalikes, and treat solitary uncertain photos as tentative identifications until you gather more context.